概要
Red Hat CodeReady Containers (CRC)とは、ローカルコンピューターに最小限の
OpenShift Container Platform 4 クラスターおよびPodman コンテナーランタイムが使用できる環境みたいです。
ローカルコンピューターで構築できるもので”Minishift”もありますが、
これはOpenShift 3系で古いので最新バージョンが使えるCRCで環境を構築します。
システム要件
システム要件は以下で多少スペックがいりますね。
公式サイトのここで詳細を確認してください。
- スペック
- 物理 CPU コア 4 個
- 空きメモリー 10.5 GB
- ストレージ領域の 35 GB
- OS
- Windows
- macOS
- Linux
検証環境
今回は、以下環境のWSLにRed Hat CodeReady Containers(CRC)をインストールしていきます。
最新バージョンは ここで確認できます
- Windows 11 Home
- WSL2 (Ubuntu 22.04.4 LTS)
- OpenShift
- Red Hat CodeReady Containers(CRC) 2.36.0
※Windowsは、Hyper-Vを使用してOpenShift環境を構築するので"Windows Home"はサポート外みたいです。
CRC のダウンロード
RedHatの公式サイトからプラットフォーム用の CodeReady コンテナーの最新リリース をダウンロードします。
※Red Hatのアカウントでログインする必要があります。持っていなければ、無料で作成できるので作成しましょう。
- 手順
- 公式サイトにアクセス
- [Select an OpenShift cluster type to create]画面で[Local]タブを選択
- [Download what you need to get started]から[Linux]を選択後、
[Download OPenShift Local]をクリックしてファイルをダウンロード - [Download Pull secret]をクリックしてファイルをダウンロード
- ※secretは、CRCのインストールで使用します。
- ダウンロードしたファイルをWSLで使用できるようWindowsから"\wsl.localhost\Ubuntu\tmp"にファイルを移動

事前準備
Debian/Ubuntuで、Red Hat OpenShift Localを構築するのに必要なソフトウェアパッケージをインストールします
apt update
apt upgrade
sudo apt install qemu-kvm libvirt-daemon libvirt-daemon-system network-manager
Red Hat CodeReady Containers(CRC)のインストール
Red Hat CodeReady Containers(CRC)を以下手順(公式手順はここ)でインストールします。
- ファイル確認
ll /tmp/crc-linux-amd64.tar.xz- ファイル展開
tar xvf /tmp/crc-linux-amd64.tar.xz- ファイル移動
mv crc-linux-2.36.0-amd64/crc /usr/bin/- コマンド確認
crc -h
crc version
以下のようにコマンドが実行できれば、成功です
# crc version
CRC version: 2.36.0+27c493
OpenShift version: 4.15.12
Podman version: 4.4.4
#
Red Hat OpenShift Local のセットアップ
Red Hat CodeReady Containers(CRC)を使用する環境をセットアップをします。
事前準備
WSLから一旦ログアウトし、コマンドプロンプトを管理者権限で起動します。
以下、コマンドでWSLを再起動します。
>wsl.exe --shutdownWSLを再起動しないままセットアップすると以下エラーになります。
tech-0222@MSI:~$ crc setup
CRC is constantly improving and we would like to know more about usage (more details at https://developers.redhat.com/article/tool-data-collection)
Your preference can be changed manually if desired using 'crc config set consent-telemetry <yes/no>'
Would you like to contribute anonymous usage statistics? [y/N]: n
No worry, you can still enable telemetry manually with the command 'crc config set consent-telemetry yes'.
INFO Using bundle path /home/tech-0222/.crc/cache/crc_libvirt_4.15.12_amd64.crcbundle
INFO Checking if running as non-root
INFO Checking if running inside WSL2
INFO Checking if crc-admin-helper executable is cached
INFO Caching crc-admin-helper executable
INFO Using root access: Changing ownership of /home/tech-0222/.crc/bin/crc-admin-helper-linux
[sudo] password for tech-0222:
INFO Using root access: Setting suid for /home/tech-0222/.crc/bin/crc-admin-helper-linux
INFO Checking if running on a supported CPU architecture
INFO Checking if crc executable symlink exists
INFO Creating symlink for crc executable
INFO Checking minimum RAM requirements
INFO Check if Podman binary exists in: /home/tech-0222/.crc/bin/oc
INFO Checking if Virtualization is enabled
INFO Checking if KVM is enabled
INFO Checking if libvirt is installed
INFO Checking if user is part of libvirt group
INFO Checking if active user/process is currently part of the libvirt group
You need to logout, re-login, and run crc setup again before the user is effectively a member of the 'libvirt' group.
tech-0222@MSI:~$
Red Hat OpenShift Local セットアップ
WSLにログインして、コマンド”crc setup”を実行してセットアップします。
※完了まで数十分かかります。
tech-0222@MSI:~$ crc setup
INFO Using bundle path /home/tech-0222/.crc/cache/crc_libvirt_4.15.12_amd64.crcbundle
INFO Checking if running as non-root
INFO Checking if running inside WSL2
INFO Checking if crc-admin-helper executable is cached
INFO Checking if running on a supported CPU architecture
INFO Checking if crc executable symlink exists
INFO Checking minimum RAM requirements
INFO Check if Podman binary exists in: /home/tech-0222/.crc/bin/oc
INFO Checking if Virtualization is enabled
INFO Checking if KVM is enabled
INFO Checking if libvirt is installed
INFO Checking if user is part of libvirt group
INFO Checking if active user/process is currently part of the libvirt group
INFO Checking if libvirt daemon is running
INFO Checking if a supported libvirt version is installed
INFO Checking if crc-driver-libvirt is installed
INFO Installing crc-driver-libvirt
INFO Checking crc daemon systemd service
INFO Setting up crc daemon systemd service
INFO Checking crc daemon systemd socket units
INFO Setting up crc daemon systemd socket units
INFO Checking if AppArmor is configured
INFO Updating AppArmor configuration
INFO Using root access: Updating AppArmor configuration
INFO Using root access: Changing permissions for /etc/apparmor.d/libvirt/TEMPLATE.qemu to 644
INFO Checking if systemd-networkd is running
INFO Checking if NetworkManager is installed
INFO Checking if NetworkManager service is running
INFO Checking if /etc/NetworkManager/conf.d/crc-nm-dnsmasq.conf exists
INFO Writing Network Manager config for crc
INFO Using root access: Writing NetworkManager configuration to /etc/NetworkManager/conf.d/crc-nm-dnsmasq.conf
INFO Using root access: Changing permissions for /etc/NetworkManager/conf.d/crc-nm-dnsmasq.conf to 644
INFO Using root access: Executing systemctl daemon-reload command
INFO Using root access: Executing systemctl reload NetworkManager
INFO Checking if /etc/NetworkManager/dnsmasq.d/crc.conf exists
INFO Writing dnsmasq config for crc
INFO Using root access: Writing NetworkManager configuration to /etc/NetworkManager/dnsmasq.d/crc.conf
INFO Using root access: Changing permissions for /etc/NetworkManager/dnsmasq.d/crc.conf to 644
INFO Using root access: Executing systemctl daemon-reload command
INFO Using root access: Executing systemctl reload NetworkManager
INFO Checking if libvirt 'crc' network is available
INFO Setting up libvirt 'crc' network
INFO Checking if libvirt 'crc' network is active
INFO Starting libvirt 'crc' network
INFO Checking if CRC bundle is extracted in '$HOME/.crc'
INFO Checking if /home/tech-0222/.crc/cache/crc_libvirt_4.15.12_amd64.crcbundle exists
INFO Getting bundle for the CRC executable
INFO Downloading bundle: /home/tech-0222/.crc/cache/crc_libvirt_4.15.12_amd64.crcbundle...
4.67 GiB / 4.67 GiB [-------------------------------------------------------------------------------------------------------] 100.00% 3.51 MiB/s
INFO Uncompressing /home/tech-0222/.crc/cache/crc_libvirt_4.15.12_amd64.crcbundle
crc.qcow2:  20.01 GiB / 20.01 GiB [----------------------------------------------------------------------------------------------------] 100.00%
oc:  149.79 MiB / 149.79 MiB [---------------------------------------------------------------------------------------------------------] 100.00%
Your system is correctly setup for using CRC. Use 'crc start' to start the instance
tech-0222@MSI:~$
OpenShiftを起動させる
OpenShiftを"crc start"コマンドでOpenShiftを起動させます。
コマンドオプションの”/tmp/pull-secret.txt”は、Redhatサイトからダウンロードした
"Download Pull secret"のパスを指定します。
※プルシークレットは、OpenShiftイメージの取得に必要な認証情報を含むファイルです。
tech-0222@MSI:~$ crc start -p /tmp/pull-secret.txt
INFO Using bundle path /home/tech-0222/.crc/cache/crc_libvirt_4.15.12_amd64.crcbundle
INFO Checking if running as non-root
INFO Checking if running inside WSL2
INFO Checking if crc-admin-helper executable is cached
INFO Checking if running on a supported CPU architecture
INFO Checking if crc executable symlink exists
INFO Checking minimum RAM requirements
INFO Check if Podman binary exists in: /home/tech-0222/.crc/bin/oc
INFO Checking if Virtualization is enabled
INFO Checking if KVM is enabled
INFO Checking if libvirt is installed
INFO Checking if user is part of libvirt group
INFO Checking if active user/process is currently part of the libvirt group
INFO Checking if libvirt daemon is running
INFO Checking if a supported libvirt version is installed
INFO Checking if crc-driver-libvirt is installed
INFO Checking crc daemon systemd socket units
INFO Checking if AppArmor is configured
INFO Checking if systemd-networkd is running
INFO Checking if NetworkManager is installed
INFO Checking if NetworkManager service is running
INFO Checking if /etc/NetworkManager/conf.d/crc-nm-dnsmasq.conf exists
INFO Checking if /etc/NetworkManager/dnsmasq.d/crc.conf exists
INFO Checking if libvirt 'crc' network is available
INFO Checking if libvirt 'crc' network is active
INFO Loading bundle: crc_libvirt_4.15.12_amd64...
INFO Creating CRC VM for OpenShift 4.15.12...
INFO Generating new SSH key pair...
INFO Generating new password for the kubeadmin user
INFO Starting CRC VM for openshift 4.15.12...
INFO CRC instance is running with IP 192.168.130.11
INFO CRC VM is running
INFO Updating authorized keys...
INFO Configuring shared directories
INFO Check internal and public DNS query...
INFO Check DNS query from host...
WARN Wildcard DNS resolution for apps-crc.testing does not appear to be working
INFO Verifying validity of the kubelet certificates...
INFO Starting kubelet service
INFO Waiting for kube-apiserver availability... [takes around 2min]
INFO Adding user's pull secret to the cluster...
INFO Updating SSH key to machine config resource...
INFO Waiting until the user's pull secret is written to the instance disk...
INFO Changing the password for the kubeadmin user
INFO Updating cluster ID...
INFO Updating root CA cert to admin-kubeconfig-client-ca configmap...
INFO Starting openshift instance... [waiting for the cluster to stabilize]
INFO 3 operators are progressing: console, image-registry, ingress
INFO 3 operators are progressing: console, image-registry, ingress
INFO Operator ingress is progressing
INFO Operator ingress is progressing
INFO All operators are available. Ensuring stability...
INFO Operators are stable (2/3)...
INFO Operators are stable (3/3)...
INFO Adding crc-admin and crc-developer contexts to kubeconfig...
Started the OpenShift cluster.

The server is accessible via web console at:
  https://console-openshift-console.apps-crc.testing

Log in as administrator:
  Username: kubeadmin
  Password: qSgaf-NUSnM-JVEDz-WGwaT

Log in as user:
  Username: developer
  Password: developer

Use the 'oc' command line interface:
  $ eval $(crc oc-env)
  $ oc login -u developer https://api.crc.testing:6443
tech-0222@MSI:~$
WSL内で"curl "コマンドを実行して応答があれば成功です。
$ curl -k https://console-openshift-console.apps-crc.testingcrc start 実行時の「WARN Wildcard DNS resolution for apps-crc.testing does not appear to be working」について
調べるとバグまたは、ローカル開発だと仕様かもしれないので一旦そのままで進める
https://github.com/crc-org/crc/issues/2889
https://github.com/crc-org/crc/issues/3078
また、CRCのDNS設定を調べるとここに書いてある通り自動で追記されているので多分大丈夫かな。
tech-0222@MSI:~$ cat /etc/NetworkManager/dnsmasq.d/crc.conf
server=/apps-crc.testing/192.168.130.11
server=/crc.testing/192.168.130.11
tech-0222@MSI:~$
OpenShift コンソールへのアクセス
今回の構成では、WindowsホストからWSL内の仮想サーバ上のIPアドレスに直接アクセスすることはできません。
なので、Tera TermのSSHポートフォワーディングを使用してOpenShiftのダッシュボードにアクセスします。
WSL内のIPアドレスの確認
"crc start"すると、自動で"/etc/hosts"にRed Hat CodeReady Containers(CRC)に必要な
情報が追記されるみたいです。
このIPをSSHポートフォワーディングで使います。
※以下例だと"192.168.130.11"のこと
tech-0222@MSI:~$ cat /etc/hosts
# Added by CRC
192.168.130.11   api.crc.testing canary-openshift-ingress-canary.apps-crc.testing console-openshift-console.apps-crc.testing default-route-openshift-image-registry.apps-crc.testing downloads-openshift-console.apps-crc.testing oauth-openshift.apps-crc.testing
# End of CRC section
tech-0222@MSI:~$
WSLのeth0で使用しているIPアドレスをSSHアクセスで使うので、確認します
ip addr show eth0- 実行例(例だと「172.24.50.116」が該当IP)
tech-0222@MSI:~$ ip addr show eth0
2: eth0: <BROADCAST,MULTICAST,UP,LOWER_UP> mtu 1500 qdisc mq state UP group default qlen 1000
link/ether 00:15:5d:b3:8f:aa brd ff:ff:ff:ff:ff:ff
inet 172.24.50.116/20 brd 172.24.63.255 scope global eth0
   valid_lft forever preferred_lft forever
inet6 fe80::215:5dff:feb3:8faa/64 scope link
   valid_lft forever preferred_lft forever
tech-0222@MSI:~$
SSHサーバの設定
WSL上でのSSHサーバの設定します。
詳細はここで確認してください。
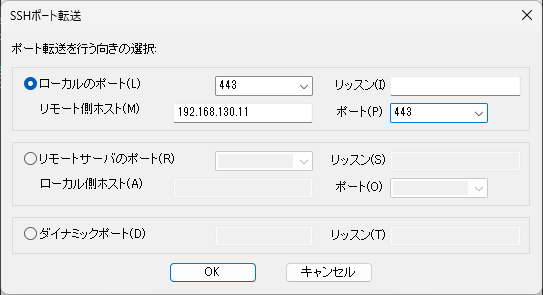
sshトンネルの設定
WSLを経由してOpenShift用アドレスにアクセスできるよう以下設定をします。
-
Tera Term を起動してWslのIPアドレスにWSLユーザでSSH接続をする
- ※接続状態で以下手順を実行
-
Tera Term メニューの「設定」>「SSH転送」を選択
-
SSHポート転送画面にて、[追加]を選択
-
設定画面で以下を入力後、[OK]を選択
-
SSHポート転送画面にて、[OK]を選択して設定を保存
-
設定例
- 注意
- ローカルのポートを443以外にするとOpenShiftのアクセス画面が表示されません。
| 項目 | 値 | 項目 | 値 |
|---|---|---|---|
| ローカルのポート | 443 | リッスン | <空白のまま> |
| リモート側ホスト | WSLの/etc/hostsにCRCに自動で追記されたIPを設定 | ポート | 443 |
- 例
Windows の /etc/hosts を編集
SSHポートフォワーディングを設定してIPアドレスでアクセスできる状態になりました。
ただ、OpenShiftコンソールにIPアドレスでアクセスしてもログイン画面が表示されません。
ドメイン名でアクセスできるようWindowsのhostsに以下内容を追記します。
※ドメイン名は、WSLのhostsに追記されたものを使います。
- 例
127.0.0.1 api.crc.testing canary-openshift-ingress-canary.apps-crc.testing console-openshift-console.apps-crc.testing default-route-openshift-image-registry.apps-crc.testing downloads-openshift-console.apps-crc.testing oauth-openshift.apps-crc.testing※Windowsのhostsファイルは、”C:\Windows\System32\drivers\etc\hosts”にあります。
OpenShift コンソールへアクセス
Windowsのブラウザから"https://console-openshift-console.apps-crc.testing"にアクセスします。

- ログインするとこんな画面が表示されます。

ログイン情報は、"crc start"の実行結果にある以下ですね
The server is accessible via web console at:
  https://console-openshift-console.apps-crc.testing

Log in as administrator:
  Username: kubeadmin
  Password: qSgaf-NUSnM-JVEDz-WGwaT

Log in as user:
  Username: developer
Password: developerアクセス情報は、以下コマンドでも確認できます。
- アクセスURL
tech-0222@MSI:~$ crc console --url
https://console-openshift-console.apps-crc.testing
tech-0222@MSI:~$- ID/PW
tech-0222@MSI:~$ crc console --credentials
To login as a regular user, run 'oc login -u developer -p developer https://api.crc.testing:6443'.
To login as an admin, run 'oc login -u kubeadmin -p qSgaf-NUSnM-JVEDz-WGwaT https://api.crc.testing:6443'
tech-0222@MSI:~$
CLI 操作(ocコマンド)
oc(OpenShift CLI)コマンドを実行できるようパスを設定します。
必要な作業は、"crc start"の実行結果にある以下です。
Use the 'oc' command line interface:
  $ eval $(crc oc-env)
$ oc login -u developer https://api.crc.testing:6443- 実行例
tech-0222@MSI:~$ eval $(crc oc-env)
tech-0222@MSI:~$ oc login -u developer https://api.crc.testing:6443
Logged into "https://api.crc.testing:6443" as "developer" using existing credentials.

You don't have any projects. You can try to create a new project, by running

oc new-project <projectname>- 実行結果通りプロジェクトを作成してみると以下結果になります
tech-0222@MSI:~$ oc new-project test
Now using project "test" on server "https://api.crc.testing:6443".

You can add applications to this project with the 'new-app' command. For example, try:

    oc new-app rails-postgresql-example

to build a new example application in Ruby. Or use kubectl to deploy a simple Kubernetes application:

    kubectl create deployment hello-node --image=registry.k8s.io/e2e-test-images/agnhost:2.43 -- /agnhost serve-hostname

tech-0222@MSI:~$
その他
WSLが停止や仮想マシンを”crc stop”で停止すると、次に起動した際に以下のようなエラーが発生し起動が失敗することがあります。
- エラー(1)
INFO Adding crc-admin and crc-developer contexts to kubeconfig...
ERRO Cannot update kubeconfig: Head "https://oauth-openshift.apps-crc.testing": dial tcp 192.168.130.11:443: connect: connection refused
Started the OpenShift cluster.- エラー(2)
INFO Waiting for kube-apiserver availability... [takes around 2min]
Error waiting for apiserver: Temporary error: ssh command error:
command : timeout 5s oc get nodes --context admin --cluster crc --kubeconfig /opt/kubeconfig
err     : Process exited with status 1
 (x219)
tech-0222@MSI:~$
とりあえず、以下順番にコマンドを実行してOpenShiftの入れ直しすれば、再度利用することができました。 ※結構な頻度でエラーになりますね。。
※参考ドキュメントはここを参照
# 仮想マシンを停止
crc stop

# 仮想マシンを削除
crc delete

# 変更をクリーンアップ
crc setup

# 起動
crc start -p /tmp/pull-secret.txt
まとめ
WSLのUbuntuがサポート外でしたが、この手順でRed Hat CodeReady Containers(CRC)をインストールすることはできました。これでローカル環境でOpenShiftの操作等が試せるようなったので、いろいろ試してみたいと思います。